Friday, October 15, 2010

Homemade Halloween... A Guest Post from Blessed Little Nest! :)

Hello again friends, and happy Friday!
Today is the last day of my Homemade Halloween week!
I have had such fun, and am walking away from this week with so many fabulous ideas for the coming weeks to prepare for a spooky and handmade holiday! :) I am so happy to share with you another few guest posts for the week from Heather at Blessed Little Nest, Marta from Haus of Girls at ten o'clock, and come back at noon for the last gorgeous giveaway from Wild Olive! All winners will be announced tomorrow, so good luck!!
xoxox Holly
PS.
If you are looking for the Follow Me Friday post, it's here. Link up- and we will be back to normal next week! :)
-----------------------------------------------

Hi there Mommy Holly readers!

My name is Heather from Blessed Little Nest and I am
so excited to be hanging out with you guys today.

I adore Holly, and her love of Halloween and paper
completely inspired this easy DIY project.

...Supplies...

DSC_0017

Vintage book pages
Straw wreath
Stapler
Scissors
Sewing Pins
Wide ribbon for hanging
Embroidery Floss or Twine (yarn would work, too)
Random Bits for Embellishments- buttons, tags, etc.

DSC_0018DSC_0020


DSC_0021DSC_0022

1. I used pages from a vintage book and cut then into sections
that were 2" wide. Then I folded them in half.
2. Next I cut the folded paper into 1" sections.
3. With the fold of the paper in my hand, I cut the corners off
the other end so I could create a triangle. I made eleven.
4. Then I slid my string into the fold of the triangles and used
the stapler to secure them. I placed mine about an inch apart.
Tada! You just created mini vintage paper buntings!!

DSC_0023

Use your pins to attach the bunting to your wreath.

DSC_0029DSC_0031

Add a loop of ribbon for hanging and embellish as you like.
I decided to add orange buttons to my pins and jazzed up my office
tag with a little black marker and a hand cut pumpkin.

DSC_0034

Simple. Graphic. Festive.


Thank you so much for having me over Holly!
I loved being a part of this fun week.

Photobucket

follow me friday.

This has been a busy week.
I mean, a freakishly busy week.
Lots of orders.
Halloween costumes to make.
Parties to plan.
Errands to run.
Volunteering at school.
You get the picture. :)
So my Follow Me Fridays photos got left in the dust.
Only two photos were taken this week, both on the same day.
But it was a fantastic day, so I am sharing anyways. :)

Picnik collage
I snapped these photos with my phone last Friday when we took a little day trip up to Idyllwild. It was seriously beautiful there. A bit on the chilly side, but still bright and clear. A perfect day for a little mountain air. :) The photo on the left is when we stopped by a big lake and took some pictures {more to come!} and the one on the right is in the middle of town while we were shopping. I even got some Christmas shopping done for Andrew at a darling little store. :)
What did you do this week?
Can we follow you as well? :)
Grab the button, link up and now it's time for the conclusion on my Homemade Halloween week, so please check back all day today!!
xo! :)


Powered by Linky Tools

Click here to enter your link and view this Linky Tools list...

Thursday, October 14, 2010

Homemade Halloween... A Giveaway from Too Silly Sisters! :)

Today's giveaway is so super cute!
Lori from Too Silly Sisters has made a necklace especially for the Homemade Halloween event! I have one of Lori's button bracelets from her darling shop and I adore it. She makes beautiful jewelry and is a seriously delightful person! :)

This is how Lori describes herself...
"I am a home schooling Mom that loves the Lord, my precious family, ice cold Pepsi, chips and salsa, photography, eating veggies from my garden, staying up late watching movies, handmade quilts, laughing till I cry, creating jewelry, having my hair brushed, margaritas, the beach, and not camping. :) "

Picnik collage
Want to enter to win this fun Trick Or Treat Posh Posie Necklace?

Here's how:
1. Visit Two Silly Sisters and let me know your favorite item!
2. Pay Lori a visit to her blog and become a follower!
3. Let me know in the comments on this post what you are planning on dressing up as for Halloween this year! Or possibly what you are dressing your kids up as? I love to hear new ideas for costumes! :)

And guess what else?
Lori is offering 20% off your purchase in her store until October 19th! Mention you are a reader of Mommy Holly in the message to seller section :) Yay!

Good luck-
a winner will be announced on Saturday, along with the other giveaway winners as well. Here are links to the open giveaways that you might have missed:

Happy Thursday, friends!
See you tomorrow morning for another fun guest post from Heather at Blessed Little Nest and the last day of a Homemade Halloween! xo!

Homemade Halloween... A Guest Post & Giveaway from Bringing Up Burns! :)

Good morning, blog friends! Welcome to another day of handmade fabulousness!! Today we have a super fun tutorial from Erin at Bringing Up Burns who is so creative! :) And make sure to enter her giveaway... details at the end of the post! Another giveaway will be today at noon, don't miss it!
xoxox Holly
----------------------------------------------

Hello fellow Mommy Holly readers!

I'm Erin from Bringing Up Burns.

When I'm not busy "bringing up" my goblins, I love to create, sew, bake, blog, run and read. I also gather ruffles and twirl rosettes to fill my shop, Haute Blue B, with fabulousness.

Today, I'm going to show you how to make one of my most popular items.

A Haute Ruffle Tank...with a Haunted twist!

You'll need:

One tank top
Two 1/8 yard pieces of Chiffon (Halloween themed if you want!)
sewing machine & accessories

Take your first piece of Chiffon and cut it into a 3 inch wide strip the length of the fabric (usually 54 inches)

Take your second piece of Chiffon and cut it into a 2 inch wide strip.


Set your sewing machine to the longest stitch length.


And the tightest tension!


Place the 2 inch strip on top of the 3 inch strip so that one edge matches up. Fold the raw end under.

Begin sewing down the right side about an inch in from the edge. Remember to back stitch when you start!


As you stitch, the tight tension and long stitch length should work to automatically ruffle up your two layers of chiffon nice and neat!


Continue down the length of the fabrics until you are almost to the bottom end.


Again, fold under the raw end, and then finish stitching, remembering to back stitch when you are done!


Adjust your stitch length and tension back to normal and then stitch your ruffle to your tank. I like to add it to one shoulder and a little down the neckline. Try to stitch right over the gathering stitch. You'll probably have to go slow and stop and start a bit to keep the ruffle from bunching up!


Super cute! Easy! Festive! and Fun!


You can use the same technique to make ruffles out of light weight cotton too!

As long as your fabric is not to heavy, it should ruffle easily.

Here's another example of a tank I made using cotton ruffles and some Rolled Rosettes!


So...What do you think of the Haute Ruffle Tank? I'm quite taken with the Haunted Twist.

Since my girls are too big for these tanks, I'd love to give them away to Mommy Holly readers! Do you know a little size 2T-4T someone who would look cute in these tanks? Let Holly know in the comments and she'll pick two winners. I'll mail them ASAP so your goblin can be HAUTE this Halloween!

Happy Haunting!
~Erin
-----------------------------------------

Thank you for a fab tutorial, Erin!! I want to make a pile of these tanks for myself! :) Like Erin said, if you'd like to be entered to win one of these fun tanks, leave a comment on this post.
You can get some extra entries, as well! Here's how:
1. Visit Erin's blog here and become a follower!
2. Follow her on Twitter.
3. Visit her shop here and tell me your favorite item! {The Sassafras shoe is the cutest, seriously!}

Good luck, good luck to all of you!!
Winners will be announced on Saturday! :)
See you at noon, xo!

Wednesday, October 13, 2010

Homemade Halloween... A Guest Post & Giveaway from Good Day Shop! :)

Our first guest post is from my fabulous blog-friend and crafter Teresa! Please enjoy this darling Halloween craft and tune in at noon for another post! :) And of course, you can still enter the giveaway for spreading the word about the Homemade Halloween event! Now, onto the homemade fun....!!
xo!- Holly
--------------------------------------------------

Hi fellow Mommy Holly readers!
I'm Teresa from It's A Good Day.
I am so excited to share a fun paper craft with
you as part of Holly's Homemade Halloween.

This Bibbity Bobbity Boo Pop-Up Card is
perfectly whimsical, fun and not too spooky.


Want to make your own?
Oh good. I thought you might.

Here's what you'll need:
(or use what you've got!)
black card stock (or skinny tri-fold card)
orange card stock
coordinating scrapbook paper
coordinating ribbon
googly eye embellishment
craft glue stick
glue gun
distressing ink
circle & tag paper punches


And here's how you do it:

#1 Print "bibbity bobbity boo" on orange card stock.

#2 Place orange paper inside black folded card so
that the "bibbity bobbity" is the only part you see.
I had some long, skinny tri-fold cards left over from
another project so I used these. You can also use
black card stock and fold/cut so it fits the orange card.
Then trim the just above where the orange card lays.
It becomes like a sleeve for the orange card.

#3 To make the orange card "pop" cut a thin strip of
card stock (about 4-5 inches long) and fold in a Z shape,
then glue down the bottom edge like shown above in #3.
Your placement needs to be just as shown above with
the top fold facing to the bottom of the card...this will
ensure your orange card pulls UP and OUT.

#4 With your orange card flush with the bottom edge
of the black card, glue the top of the strip to the back
of the orange card (like shown above in #4). You should be
able to pull the orange card UP and OUT once attached.

#5 & #6 Add fun embellishments!
I added an orange polka dot ribbon at the
top and loosely attached it around to the back of
the card (don't wrap too tight or your orange card
won't have enough room to pull out). I also used
one of Holly's awesome orange polka-dot
tree cutouts (get yours here!) and my circle
punch and a coordinating paper for a moon.
I printed "Happy Halloween" on white card stock
and used my tag punch for the message.
It's threaded with a fat orange ribbon with a fun
googly eye glued on top. I distressed the edge of
the tag to make it look old and worn.
The last thing I did was attach a loop of ribbon
to the top of the orange card as a "pull tab."

(In case anyone cares, the font I used
on both pieces of the card is Pharmacy.)

And here's the final result:


What friend, niece/nephew, teacher, neighbor
wouldn't LOVE to get this in his or her mailbox?!
I hope you enjoy making this card. The style can
really be used for all holidays and occasions.
Have fun with your own Handmade Halloween!

--------------------------------------------------
Thank you, Teresa! I seriously adore this card.
And guess what?
She is giving one away to one of you lucky readers!!

Want to win?? Here's how:
1. Visit Good Day Shop and tell me your favorite item!
2. Become a follower of Teresa's blog here!
3. Follow her on Twitter!
4. Become a fan of Good Day Shop on Facebook!
5. Leave me a comment on this post letting me know your favorite Halloween candy! {I'm a sucker for treats!} :)

Good luck, and I will announce the winner on Saturday, along with the winners of the other giveaways! :) Have you missed any?
Current Giveaways:
Mommy Holly {$15 Shop Credit}
The Pleated Poppy {$25 Shop Credit}
Happy Wednesday! :)
xo!

Tuesday, October 12, 2010

Homemade Halloween... A Simple How-to! :)

It is amazing what you can do with some dollar store finds and some black spray paint.
I found these candlesticks at the local 99cent store, and immediately bought them.
I loved the shape, but hated the color.
z 335
For Andrew's Halloween party that I am throwing next week, I wanted all of the decor to be black and glittery and magical. There was no room for tacky creamish-yellow skulls at all. :)
z 336
So, a can of glossy black spray paint became my new best friend!!

And voila!

z 340
Now, I seriously love these.
I can't get enough of them!

With a little vision and creativity, you can change the drabbest of decorations into something you love. Find funky pieces at a thrift store, a dollar store, or at a craft store like Michael's. Maybe it isn't perfect yet, but use your imagination and spray paint it one solid color. Simple, homemade makeover and so super easy! :)

I can't wait to use these candlesticks on the table for Andrew and his friends.
Little boys think skulls are fantastic. :)

Are you loving the Homemade Halloween week?
I know I am!

Tune in tomorrow morning for the cutest of crafts & a giveaway from Teresa!
xo!

Homemade Halloween... A Guest Post from Real Moms Eat Food! :)

Welcome to the second day of my Homemade Halloween event! I am having so much fun with this, and am excited to share with you the next guest blogger for today, Beth from Real Moms Love To Eat. She has cooked up a spooky snack that any kid would flip over! Read on, friends! I will see you again this afternoon for another post {from yours truly!} featuring a simple Halloween decor makeover tutorial. Don't miss it! :)
xo-Holly

-----------------------------------------------

This post is by Beth Aldrich, author of the upcoming book, Real Moms Love to Eat (Penguin Books, NAL, 2011) and Certified Healthy Lifestyle-Green Living Expert and mother of three hungry boys! Visit Real Moms Love to Eat here!

Serving Up Haunted Dogs, Real Moms Style!

This real mom loves to eat healthy, delicious food. But sometimes salads and reduction sauces just don’t kick it with my three hungry sons, so I’ve come up with a few kid-friendly options over the years. Last week, my third grade co-room parent asked me to come up with some cute, nutritious ideas for our classroom Halloween party. I couldn’t resist the urge to suggest one of my own childhood favorites, protein-packed, organic Haunted Dogs!

Monday, October 11, 2010

Homemade Halloween... A Giveaway from The Pleated Poppy! :)

Today's giveaway is so super exciting!
Lindsey from The Pleated Poppy, one of my favorite handmade shops & fellow Queen Bee, is generously giving away a $25 shop credit to her shop!

This is how Lindsey describes herself...
"hi ! i'm lindsey cheney. i am married to an incredibly supportive husband and am mom to 3 littles, 6 and under. my days are full of sewing, home schooling, crafting, snuggling, avoiding the laundry, sneaking bites of chocolate, and wondering "is it naptime yet?". "

Picnik collage

Want to enter to win the $25 shop credit?!

Here's how:
1. Visit The Pleated Poppy and let me know your favorite item!
2. Pay Lindsey a visit to her blog and become a follower!
3. Let me know in the comments on this post what your favorite part of Halloween is. :)

Good luck-
a winner will be announced on Saturday, along with the week's other giveaway winners as well. Did you miss the Mommy Holly giveaway? There is still time to enter if you share the news of the Homemade Halloween event! :)

Happy Monday, friends!
See you tomorrow morning for another fun and delish guest post & recipe from Beth at Real Moms Love to Eat!! xo!

Homemade Halloween... A Guest Post from Sumo's Sweet Stuff! :)

Good morning, and welcome to my Homemade Halloween week!
We will be celebrating the happiness of the handmade this week through guest posts, crafts, tutorials, ideas, recipes, and even lots of giveaways!! Let's get to it!

Our first guest post is from the wonderfully crafty Sumo! Please enjoy this darling Halloween craft and tune in at noon for another post! :) And of course, you can still enter the giveaway for spreading the word about the Homemade Halloween event! And tune in at noon today for another fab giveaway! Now, onto the homemade fun....!!
xo!- Holly
--------------------------------------------------


Hello everyone!

I'm so excited to be guest blogging here today! I know I'm in some great company with the other guest bloggers lined up for the week!

I'm Sumo, from Sumo's Sweet Stuff!


Sumo's Sweet Stuff

My real name is Summer, but my husband nicknamed me Sumo when we were dating. (Should I be offended?) Now he's got all of my family, as well as lots of our friends, calling me Sumo. I think Aunt Sumo sounds pretty great, don't you? I live in Utah with my husband, and our two beautiful daughters - Reece & Remi!


Growing up, I never used to be all that domestic or crafty, so I think no one is more surprised than my mom at how I've ended up where I am today! I started Sumo's Sweet Stuff last May as a place to keep some of my crafting projects so that my personal blog wasn't overrun with them. Somehow, that developed into a place to host giveaways, share tutorials, share recipes, and feature fellow bloggers' ideas and blogs! I also use my blog to promote my etsy shop, so if you're ever in the market for some baby girl accessories, come on over! Every Monday is Market Yourself Monday, where you can link up your latest projects, and visit other blogs to get some inspiration!
Sumo Sweet Stuff


Today I'm going to be sharing a tutorial with you for how to embellish your kids' Halloween shirts with bat wings!

After my daughter Remi was born this past March, I made her a butterfly wing onesie.


I thought it would be fun to put a Halloween spin on that idea: bat wings!

Last year I purchased Halloween shirts from Target during the post-Halloween clearance sale for super cheap. I had thought about getting them new shirts to put the bat wings on, but then I figured their Halloween shirts would actually be perfect!

What you need:

- shirt/onesie
- fabric
- heat and bond (if you are putting wings flat on the shirt)
- interfacing (if you are putting wings that hang off the shirt)
- wing template (I looked at some pictures online and free handed mine)
- iron
- sewing machine/accessories


We'll start off with Reece's shirt. I wanted her wings to hang off of her shirt since she is mobile and can (obviously) sit, stand, and walk on her own (unlike the little Remster.)

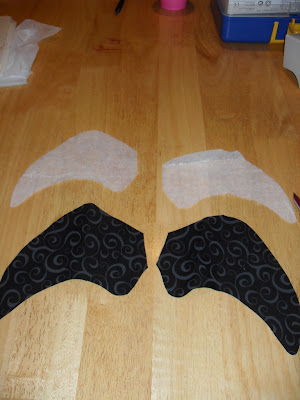
Start off by tracing your template on the interfacing. You're going to need two.


Next you'll want to trace your template on your fabric. You're going to need four wings total since you'll be having a front and back. I cut a bit outside of the template so that my interfacing would fit in between the layers easily.


Take your interfacing and iron it on to two of your wings.


Next you'll want to sew the top layer of your wings on to your interfaced wings.


After that, iron down small folds on your wings. This is where you're going to sew the wings on to the shirt.


Take your shirt and measure the width. Place a pin where the middle of the shirt is. This is where you'll sew your wings.


Pin your wings on to the shirt.


Sew the wings on to the shirt and you've got your little bat ready to go!


I did a different option for Remi. I just wanted her wings to be flat on her onesie.

You'll want to iron on some heat and bond to a piece of your fabric. (I didn't take a picture of this step for some reason!)

Trace your wing template on to your paper side of the heat and bond and cut out your wings.


Take your tape measure and find the middle of your onesie.


Take the paper backing off of your wings and place them on the onesie where you want them to go.


Iron them on.


Sew around the edges.


And your other little bat is ready to go!


Cute, fun, unique Halloween shirts!


And even cuter when on your sweet little ones!


If you have a little guy, a fun way to do the wings would be to have them extend from under his arm to his side (does that make sense?) Maybe that would seem more boy-ish.

I hope you enjoyed the tutorial! Enjoy turning your little ones into bats!

Come visit me at Sumo's Sweet Stuff anytime for more tutorials, recipes, and ideas!
Related Posts Plugin for WordPress, Blogger...