Showing posts with label guest post. Show all posts

Friday, October 15, 2010

Homemade Halloween... A Guest Post & Giveaway from Haus of Girls! :)

Our last guest post comes from the fab Marta from Haus of Girls!! :) She is teaching us how to make an adorable Halloween banner. I am thinking I'll need to whip one of these up before Andrew's Halloween party, right? And of course, pop back over at noon for the last giveaway as well! xoxox Holly

-------------------------------------------------
Hello to all you Mommy Holly fans! My name is Marta and I am stopping in from Haus of Girls where I can be found documenting my crazy life as a Midwestern Momma of three girls.
I am a fabric stalking, antique loving, diet coke chugging, treadmill running, daycare providing, pig tail making, sporty spice type of girl who has recently tapped into my creative side. I taught myself how to sew and make almost anything I see. I now create, sew, and make things on a daily basis. Today, I am so very excited to share a super fun and easy project that I did a few weeks ago.An easy (no sew option) Halloween Bunting.
Boo! Enjoy and please let me know if you make one of your own.I'd love to see your fabulous creations!
And in honor of Halloween, I would love to give away one of my "Polka Dot Pumpkin" tees that I currently have in my etsy shop. I have a size 12 month onesie all ready to go to a new home! Thank you and good luck!

Last Sunday it was rainy and yucky outside so I decided to make the most of our day stuck inside and create something fun to add to our Halloween decor.

100_1338

Using random scraps I already had lying around the house, I whipped up a Halloween bunting for our front door.
Nothing fancy.
Just simple and cute.

100_1341

Our black front door makes for the perfect backdrop for some spooktacular orange fun and I’m sure yours would too.

Take advantage of your next rainy day and make one for yourself.
Here’s what you do.

100_1305

Grab two different fabrics. One for the “flags” and one for the letters.

100_1306

Measure out your three triangles for the flags.
I made mine approximately 6 inches across and 7 inches long.
(I am not precise. Ever. I eyeball everything and it always works out fine. Perfection is not the goal, but more of the act of creating!)

100_1307

Cut out three flags.

100_1311

Iron them and re-cut any parts that look crazy.

100_1310

While ironing, glance up at your fave family picture from last year and ponder when you can get them taken again this year.

100_1312

Next, take your letter fabric and cut out a little bit smaller size of strong heat and bond.

100_1314

Iron the heat and bond onto the wrong side of your letter fabric.
Easy peasy.

100_1318

Next, trace your letters.
You can easily do this by printing off your choice of letters, cutting them out and using that as a template.
Trace the letters BACKWARDS onto your heat and bond paper that you ironed onto the fabric.

100_1319

Cut out your letters.

100_1321

Then you should have something spooktacular like this.
Boo!

100_1327

Lay the letters down onto your flags where you want them.

100_1328

Then iron.
Remember, I’m all about simplicity.

100_1329

End result.
No sewing required!

100_1333

Finally, I pinned the flags reversed and upside down on top of a striped ribbon. I found it worked well to line the flags up with the bottom stripe.
I’m all about finding tricks to make sure I sew in a straight line.

100_1334

Here it is pinned ready to be sewn.

100_1335

Start on your first letter, mine was the “b,” and sew your way down towards the last “o” until all three flags are sewn on. (If you don’t sew, just hot glue the flags on! Even easier!)

100_1336

String your fabulousness across your front door welcoming Halloween with a hint of homemade creativity.

100_1342

Spooky!

100_1343

Halloween countdown: 16 days.
Crazy.

------------------------------------------

Thank you so much Marta!! :)

If you would like to enter to win the adorable 12 month onesie, leave a comment on this post! For an extra entry, follow Marta's blog! Or visit her cute Etsy shop and let me know what you love the most!! :) Winner will be announced tomorrow!

See you all at noon! :) xo!


Homemade Halloween... A Guest Post from Blessed Little Nest! :)

Hello again friends, and happy Friday!
Today is the last day of my Homemade Halloween week!
I have had such fun, and am walking away from this week with so many fabulous ideas for the coming weeks to prepare for a spooky and handmade holiday! :) I am so happy to share with you another few guest posts for the week from Heather at Blessed Little Nest, Marta from Haus of Girls at ten o'clock, and come back at noon for the last gorgeous giveaway from Wild Olive! All winners will be announced tomorrow, so good luck!!
xoxox Holly
PS.
If you are looking for the Follow Me Friday post, it's here. Link up- and we will be back to normal next week! :)
-----------------------------------------------

Hi there Mommy Holly readers!

My name is Heather from Blessed Little Nest and I am
so excited to be hanging out with you guys today.

I adore Holly, and her love of Halloween and paper
completely inspired this easy DIY project.

...Supplies...

DSC_0017

Vintage book pages
Straw wreath
Stapler
Scissors
Sewing Pins
Wide ribbon for hanging
Embroidery Floss or Twine (yarn would work, too)
Random Bits for Embellishments- buttons, tags, etc.

DSC_0018DSC_0020


DSC_0021DSC_0022

1. I used pages from a vintage book and cut then into sections
that were 2" wide. Then I folded them in half.
2. Next I cut the folded paper into 1" sections.
3. With the fold of the paper in my hand, I cut the corners off
the other end so I could create a triangle. I made eleven.
4. Then I slid my string into the fold of the triangles and used
the stapler to secure them. I placed mine about an inch apart.
Tada! You just created mini vintage paper buntings!!

DSC_0023

Use your pins to attach the bunting to your wreath.

DSC_0029DSC_0031

Add a loop of ribbon for hanging and embellish as you like.
I decided to add orange buttons to my pins and jazzed up my office
tag with a little black marker and a hand cut pumpkin.

DSC_0034

Simple. Graphic. Festive.


Thank you so much for having me over Holly!
I loved being a part of this fun week.

Photobucket

Monday, October 11, 2010

Homemade Halloween... A Guest Post from Sumo's Sweet Stuff! :)

Good morning, and welcome to my Homemade Halloween week!
We will be celebrating the happiness of the handmade this week through guest posts, crafts, tutorials, ideas, recipes, and even lots of giveaways!! Let's get to it!

Our first guest post is from the wonderfully crafty Sumo! Please enjoy this darling Halloween craft and tune in at noon for another post! :) And of course, you can still enter the giveaway for spreading the word about the Homemade Halloween event! And tune in at noon today for another fab giveaway! Now, onto the homemade fun....!!
xo!- Holly
--------------------------------------------------


Hello everyone!

I'm so excited to be guest blogging here today! I know I'm in some great company with the other guest bloggers lined up for the week!

I'm Sumo, from Sumo's Sweet Stuff!


Sumo's Sweet Stuff

My real name is Summer, but my husband nicknamed me Sumo when we were dating. (Should I be offended?) Now he's got all of my family, as well as lots of our friends, calling me Sumo. I think Aunt Sumo sounds pretty great, don't you? I live in Utah with my husband, and our two beautiful daughters - Reece & Remi!


Growing up, I never used to be all that domestic or crafty, so I think no one is more surprised than my mom at how I've ended up where I am today! I started Sumo's Sweet Stuff last May as a place to keep some of my crafting projects so that my personal blog wasn't overrun with them. Somehow, that developed into a place to host giveaways, share tutorials, share recipes, and feature fellow bloggers' ideas and blogs! I also use my blog to promote my etsy shop, so if you're ever in the market for some baby girl accessories, come on over! Every Monday is Market Yourself Monday, where you can link up your latest projects, and visit other blogs to get some inspiration!
Sumo Sweet Stuff


Today I'm going to be sharing a tutorial with you for how to embellish your kids' Halloween shirts with bat wings!

After my daughter Remi was born this past March, I made her a butterfly wing onesie.


I thought it would be fun to put a Halloween spin on that idea: bat wings!

Last year I purchased Halloween shirts from Target during the post-Halloween clearance sale for super cheap. I had thought about getting them new shirts to put the bat wings on, but then I figured their Halloween shirts would actually be perfect!

What you need:

- shirt/onesie
- fabric
- heat and bond (if you are putting wings flat on the shirt)
- interfacing (if you are putting wings that hang off the shirt)
- wing template (I looked at some pictures online and free handed mine)
- iron
- sewing machine/accessories


We'll start off with Reece's shirt. I wanted her wings to hang off of her shirt since she is mobile and can (obviously) sit, stand, and walk on her own (unlike the little Remster.)

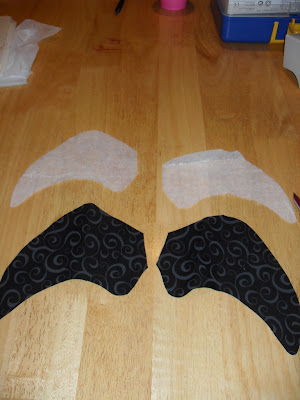
Start off by tracing your template on the interfacing. You're going to need two.


Next you'll want to trace your template on your fabric. You're going to need four wings total since you'll be having a front and back. I cut a bit outside of the template so that my interfacing would fit in between the layers easily.


Take your interfacing and iron it on to two of your wings.


Next you'll want to sew the top layer of your wings on to your interfaced wings.


After that, iron down small folds on your wings. This is where you're going to sew the wings on to the shirt.


Take your shirt and measure the width. Place a pin where the middle of the shirt is. This is where you'll sew your wings.


Pin your wings on to the shirt.


Sew the wings on to the shirt and you've got your little bat ready to go!


I did a different option for Remi. I just wanted her wings to be flat on her onesie.

You'll want to iron on some heat and bond to a piece of your fabric. (I didn't take a picture of this step for some reason!)

Trace your wing template on to your paper side of the heat and bond and cut out your wings.


Take your tape measure and find the middle of your onesie.


Take the paper backing off of your wings and place them on the onesie where you want them to go.


Iron them on.


Sew around the edges.


And your other little bat is ready to go!


Cute, fun, unique Halloween shirts!


And even cuter when on your sweet little ones!


If you have a little guy, a fun way to do the wings would be to have them extend from under his arm to his side (does that make sense?) Maybe that would seem more boy-ish.

I hope you enjoyed the tutorial! Enjoy turning your little ones into bats!

Come visit me at Sumo's Sweet Stuff anytime for more tutorials, recipes, and ideas!
Related Posts Plugin for WordPress, Blogger...